Optical
Ambient Light
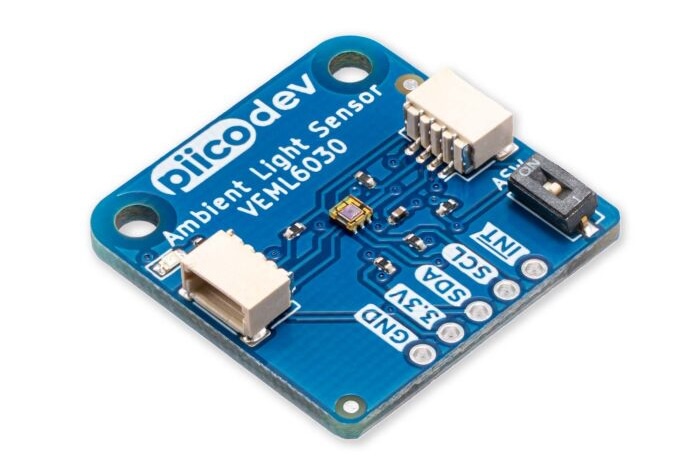
For a more accurate measurement of ambient light levels, calibrated to a standard unit of measure (lux), we can use the VEML6030 Ambient Light sensor.
We are using Core Electronics’ version of the VEML6030 sensor for this recipe (follow the link to learn more details)

Piicodev Ambient Light Sensor VEML6030.
I2C connection standards?
An increasing number and variety of sensors now use the I2C communication bus. Simply put, I2C sensors provide an easy way to connect it to a microcontroller.
The PiicoDev wiring is similar to a growing class of sensor interconnect standards such as Adafruit’s STEMMA, the identical pin order of Sparkfun’s QWIIC, or the slightly larger SeeedStudio’s Grove. Most of them are pin-compatible, but require specialty connector ends to fit. The healthy competition keeps innovation alive, but it can be slightly annoying finding the right cables to fit.
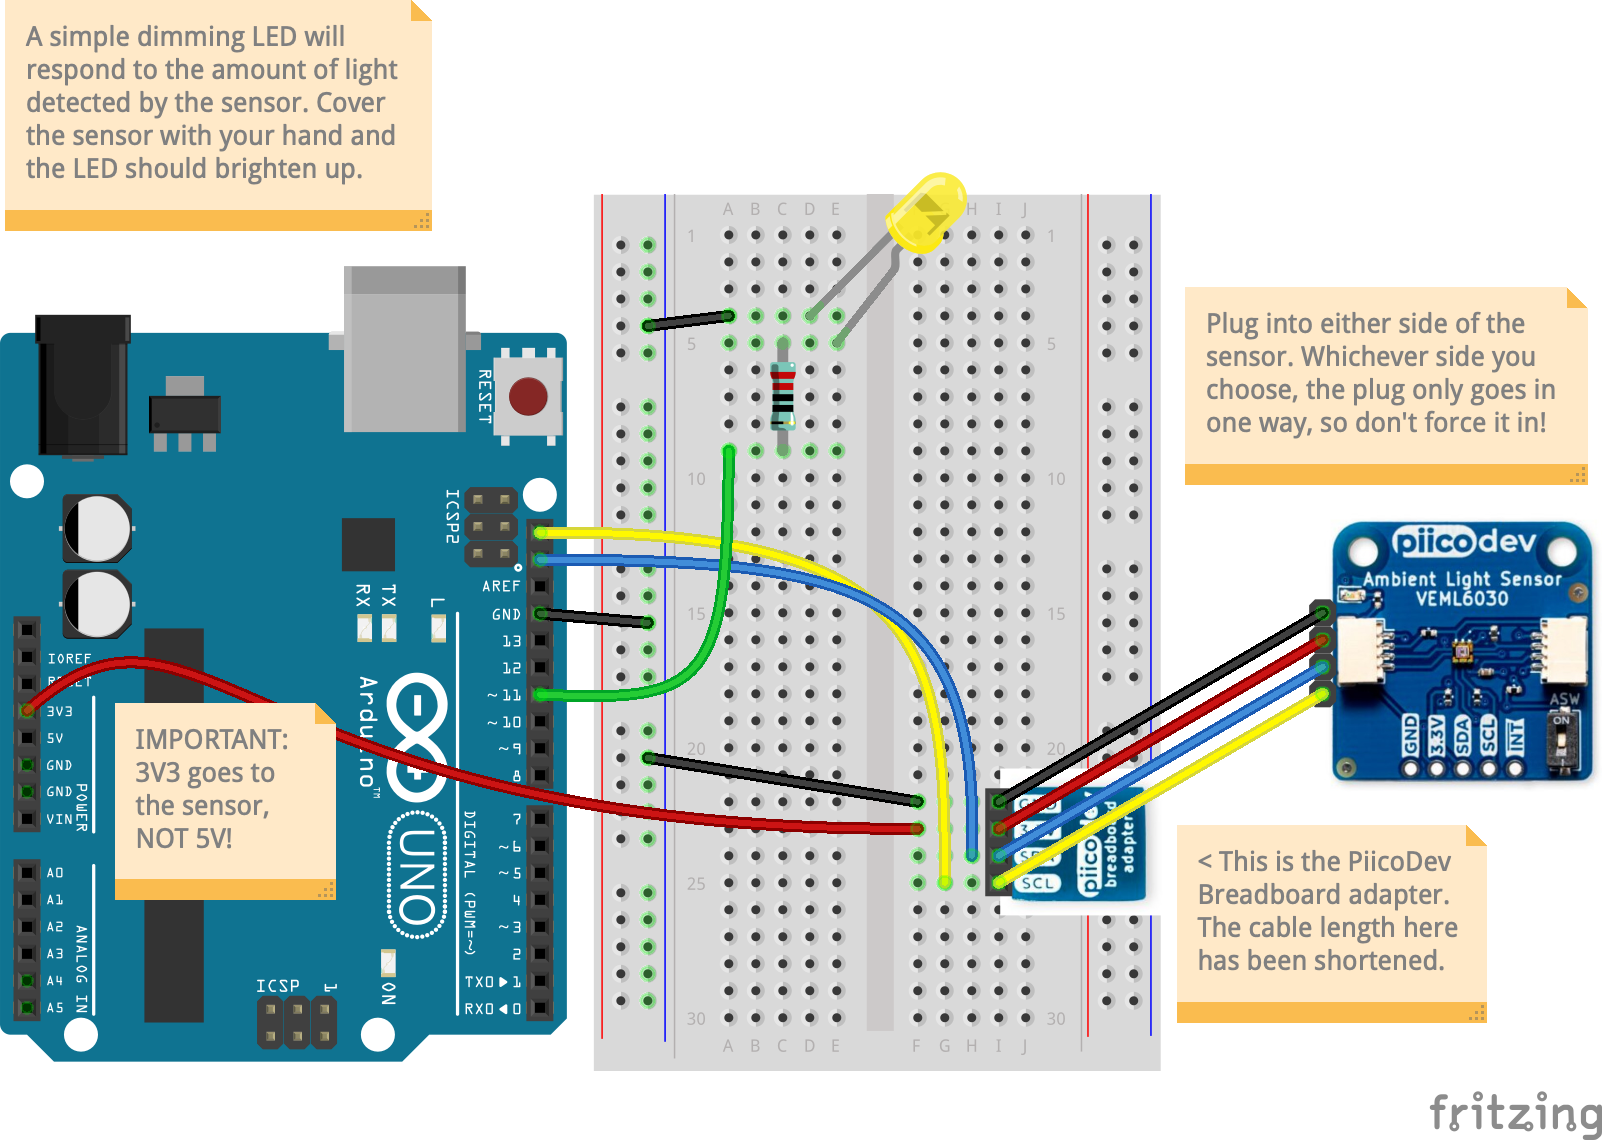
For PiicoDev sensors, you can connect the cable into either side of the sensor board. However the cable plug itself only goes into the socket one way, so exercise caution when connecting them.
Wiring & Code
Select a microcontroller platform in the tabs below to view the wiring and code meant for the platform:
-
Breadboard diagram
Ambient Light sensor & LED circuit
Download Ambient Light Fritzing file
LibrariesInstall the following libraries via your Arduino IDE’s Library Manager, if you haven’t already:
- Sparkfun Ambient Light Sensor Arduino Library
CodeFor a refresher on how to use the code in this recipe, click here.
1
2
3
4
5
6
7
8
9
10
11
12
13
14
15
16
17
18
19
20
21
22
23
24
25
26
27
28
29
30
31
32
33
34
35
36
37
38
39
40
41
42
43
44
45
46
47
48
49
50
51
52
53
54
55
56
57
58
59
60
61
62
63
64
65
66
67
68
69
70
71
72
73
74
75
76
77
78
79
80
81
82
83
84
85
86
87
88
89
90
91
92
93
94
95
96
97
98
99
100
101
102
103
104
/*
  Ambient light (lux) level sensor

  We are using the Core Electronics version of the VEML6030, but the code library is referencing a Sparkfun Library.
  It's a good point to know – that sensors can be assembled by various manufacturers, but so long as the sensor
  model number is the same, you are likely to get compatibility with code libraries written for the same sensor.

  This should return accurate lux level readings of light falling onto the sensor. This is very similar to the light
  meters used in photography units in detecting the amount of light falling on a subject.

  Adjust the parameters below to set the sensor up for either bright/dark conditions
  (Read the comments below for more details)
*/

#define AL_ADDR 0x10  // check the sensor – in the bottom corner, the tiny 'ASW' switch should be pushed towards the '1' label.
#define LED_PIN 11    // we are using the PWM-capable digital pin 11 to drive the brightness of an LED (on the UNO you can alternatively use 3, 5, 6, 9, 10, 11)

////// CUSTOMISE PARAMETERS HERE
// Change these values to suit your sensing application needs.
// Upload your sketch to the UNO after every edit, and observe the changes in sensitivity.
#define LUX_MAX 550        // set the maximum brightness level (in lux) you want to detect (550 is approximately a well-lit office)
#define LUX_MIN 10         // set the minimum brightness level (in lux)
#define LED_MINBRIGHT 0    // minimum brightness value of your LED (0-255)
#define LED_MAXBRIGHT 255  // maximum brightness value of your LED (0-255)

// Possible values: .125, .25, 1, 2
// Both .125 and .25 should be used in most cases except darker rooms.
// A gain of 2 should only be used if the sensor will be covered by a dark glass.
float gain = .125;

// Possible integration times in milliseconds: 800, 400, 200, 100, 50, 25
// Higher values give higher resolution (accuracy) but slower ('laggier') response
// and should be used in dark conditions.
int time = 100;

////// END CUSTOMISATION OPTIONS


#include <Wire.h>
#include "SparkFun_VEML6030_Ambient_Light_Sensor.h"

SparkFun_Ambient_Light light(AL_ADDR);
long luxVal = 0;

void setup() {
  pinMode(LED_PIN, OUTPUT);
  digitalWrite(LED_PIN, LOW);  // turn off the LED at startup

  Wire.begin();
  Serial.begin(115200);

  if (light.begin())
    Serial.println("Ready to sense some light!");
  else
    Serial.println("Could not communicate with the sensor!");

  light.setGain(gain);
  light.setIntegTime(time);

  Serial.println("Reading settings...");
  Serial.print("Gain: ");
  float gainVal = light.readGain();
  Serial.print(gainVal, 3);
  Serial.print(" Integration Time: ");
  int timeVal = light.readIntegTime();
  Serial.println(timeVal);
}

void loop() {
  luxVal = light.readLight();
  Serial.println(luxVal);

  int adjustedVal = constrain(luxVal, LUX_MIN, LUX_MAX);
  adjustedVal = map(adjustedVal, LUX_MIN, LUX_MAX, LED_MAXBRIGHT, LED_MINBRIGHT);
  analogWrite(LED_PIN, adjustedVal);

  delay(5);  // intentionally add a 5ms delay so as not to 'spam' the Serial port unnecessarily
}

/*
    Please note that the code provided here is licensed under the MIT license.

    The MIT License (MIT)
    Copyright © 2025 Chuan Khoo

    Permission is hereby granted, free of charge, to any person obtaining
    a copy of this software and associated documentation files (the
    "Software"), to deal in the Software without restriction, including
    without limitation the rights to use, copy, modify, merge, publish,
    distribute, sublicense, and/or sell copies of the Software, and to
    permit persons to whom the Software is furnished to do so, subject to
    the following conditions:

    The above copyright notice and this permission notice shall be included
    in all copies or substantial portions of the Software.

    THE SOFTWARE IS PROVIDED "AS IS", WITHOUT WARRANTY OF ANY KIND, EXPRESS
    OR IMPLIED, INCLUDING BUT NOT LIMITED TO THE WARRANTIES OF MERCHANTABILITY,
    FITNESS FOR A PARTICULAR PURPOSE AND NONINFRINGEMENT. IN NO EVENT SHALL
    THE AUTHORS OR COPYRIGHT HOLDERS BE LIABLE FOR ANY CLAIM, DAMAGES OR
    OTHER LIABILITY, WHETHER IN AN ACTION OF CONTRACT, TORT OR OTHERWISE,
    ARISING FROM, OUT OF OR IN CONNECTION WITH THE SOFTWARE OR THE USE OR
    OTHER DEALINGS IN THE SOFTWARE.
*/
-
COMING SOON…
More code samples for this component for other platforms will be added here over time.
