Exertion / Mechanical
Button
Buttons, or to be more exact, momentary pushbuttons or switches, are probably one of the most elementary ‘sensing’ fabricated components out there.
Momentary switches come in many sizes, and are generally designed to detect human interaction through finger presses. When it comes to creative uses though, they can do quite a bit more!
Also, have a look at microswitches – they are fundamentally identical, but have levers that make actuation easier.
Some uses (beyond finger clicking!):
- Detecting if another flat surface might tap on it with sufficient force
- Microswitches might be useful for connecting long levers to it – detecting a general frequency of liquid wave movement, wind, general lapping action
Wiring & Code
Select a microcontroller platform in the tabs below to view the wiring and code meant for the platform:
-
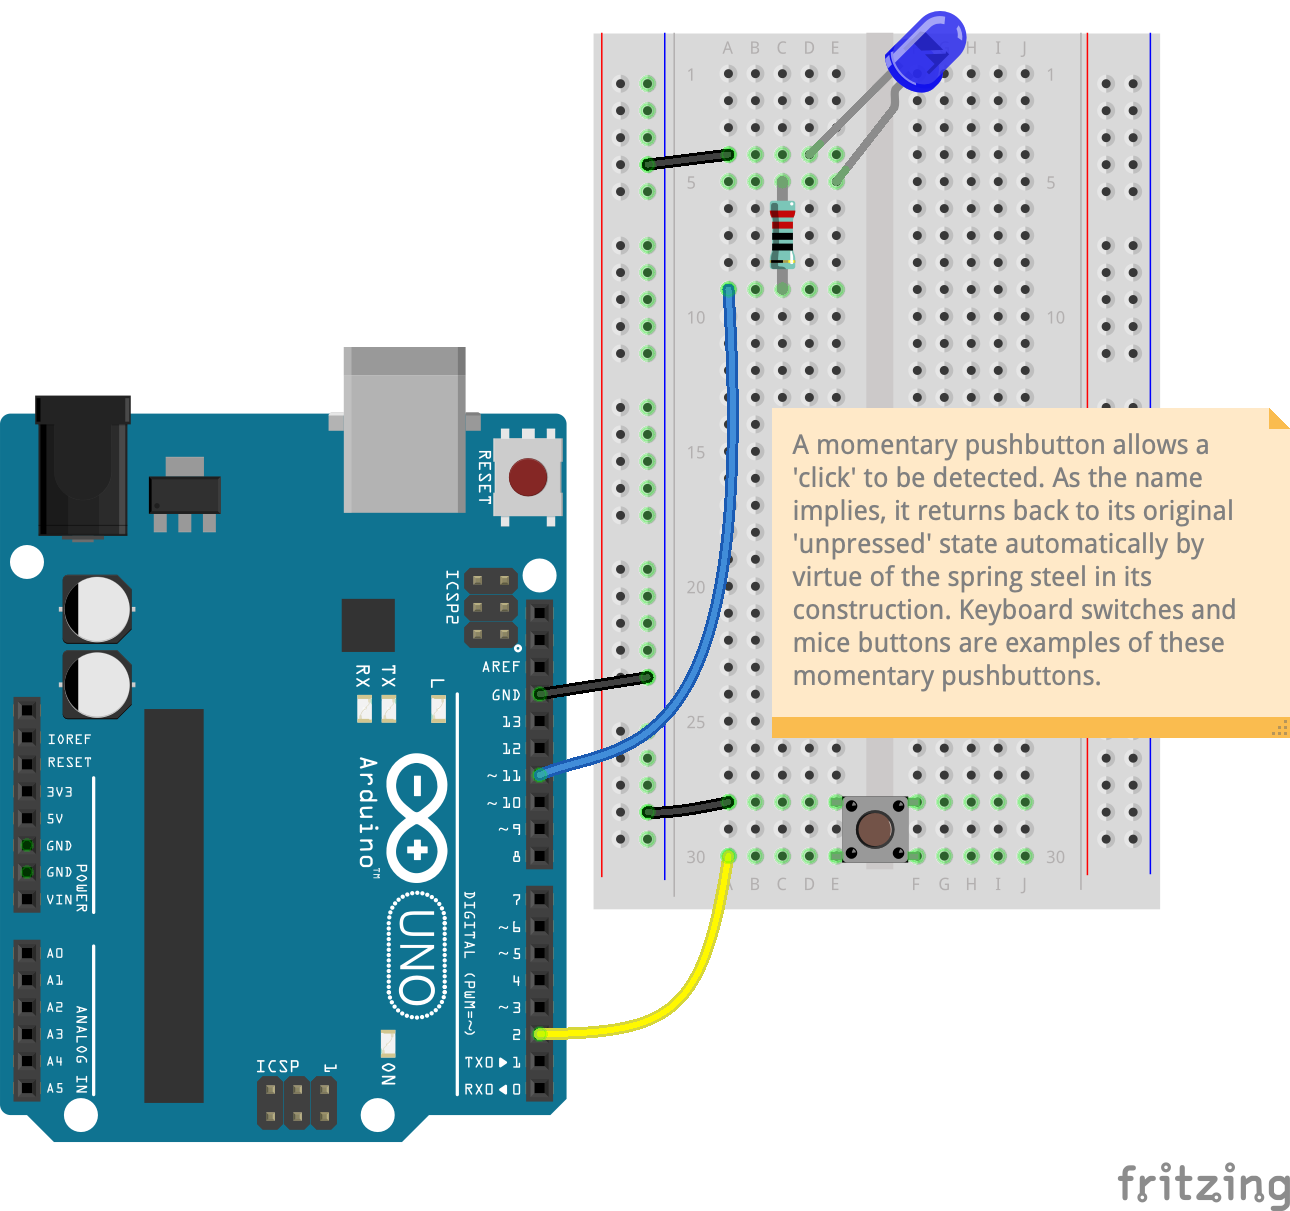
Breadboard diagram
Button & LED circuit
CodeFor a refresher on how to use the code in this recipe, click here.
1
2
3
4
5
6
7
8
9
10
11
12
13
14
15
16
17
18
19
20
21
22
23
24
25
26
27
28
29
30
31
32
33
34
35
36
37
38
39
40
41
42
43
44
45
// Momentary Pushbutton sensing code for the Arduino UNO
// Press the button and the LED lights up

// update these definitions below if you move the pins:
#define BTN_PIN 2                   // digital input pin 2
#define LED_PIN 11                  // digital/PWM pin 11

int btnVal = 0;                     // this is a variable; we use this to keep track of the button state (see line 18)

void setup() {                      // runs once at startup
    pinMode(LED_PIN, OUTPUT);
    digitalWrite(LED_PIN, LOW);     // turn off the LED at startup
    pinMode(BTN_PIN, INPUT_PULLUP); // a special command to 'stabilise' the button state
}

void loop() {                       // runs forever
    btnVal = !digitalRead(BTN_PIN); // read the state of the button (0 = pressed; 1 = released)
    digitalWrite(LED_PIN, btnVal);  // this writes out an ON (1) or OFF (0) state to the LED for visual confirmation
}

/*
    Please note that the code provided here is licensed under the MIT license.

    The MIT License (MIT)
    Copyright © 2025 Chuan Khoo

    Permission is hereby granted, free of charge, to any person obtaining
    a copy of this software and associated documentation files (the
    "Software"), to deal in the Software without restriction, including
    without limitation the rights to use, copy, modify, merge, publish,
    distribute, sublicense, and/or sell copies of the Software, and to
    permit persons to whom the Software is furnished to do so, subject to
    the following conditions:

    The above copyright notice and this permission notice shall be included
    in all copies or substantial portions of the Software.

    THE SOFTWARE IS PROVIDED "AS IS", WITHOUT WARRANTY OF ANY KIND, EXPRESS
    OR IMPLIED, INCLUDING BUT NOT LIMITED TO THE WARRANTIES OF MERCHANTABILITY,
    FITNESS FOR A PARTICULAR PURPOSE AND NONINFRINGEMENT. IN NO EVENT SHALL
    THE AUTHORS OR COPYRIGHT HOLDERS BE LIABLE FOR ANY CLAIM, DAMAGES OR
    OTHER LIABILITY, WHETHER IN AN ACTION OF CONTRACT, TORT OR OTHERWISE,
    ARISING FROM, OUT OF OR IN CONNECTION WITH THE SOFTWARE OR THE USE OR
    OTHER DEALINGS IN THE SOFTWARE.
*/
-
COMING SOON…
More code samples for this component for other platforms will be added here over time.
