Environmental
Wind/Breath
The typical qualities we want to measure of wind are:
- Intensity
- Direction
This recipe focuses on the first – intensity, and in particular, the ‘hot-wire’ sensing method.
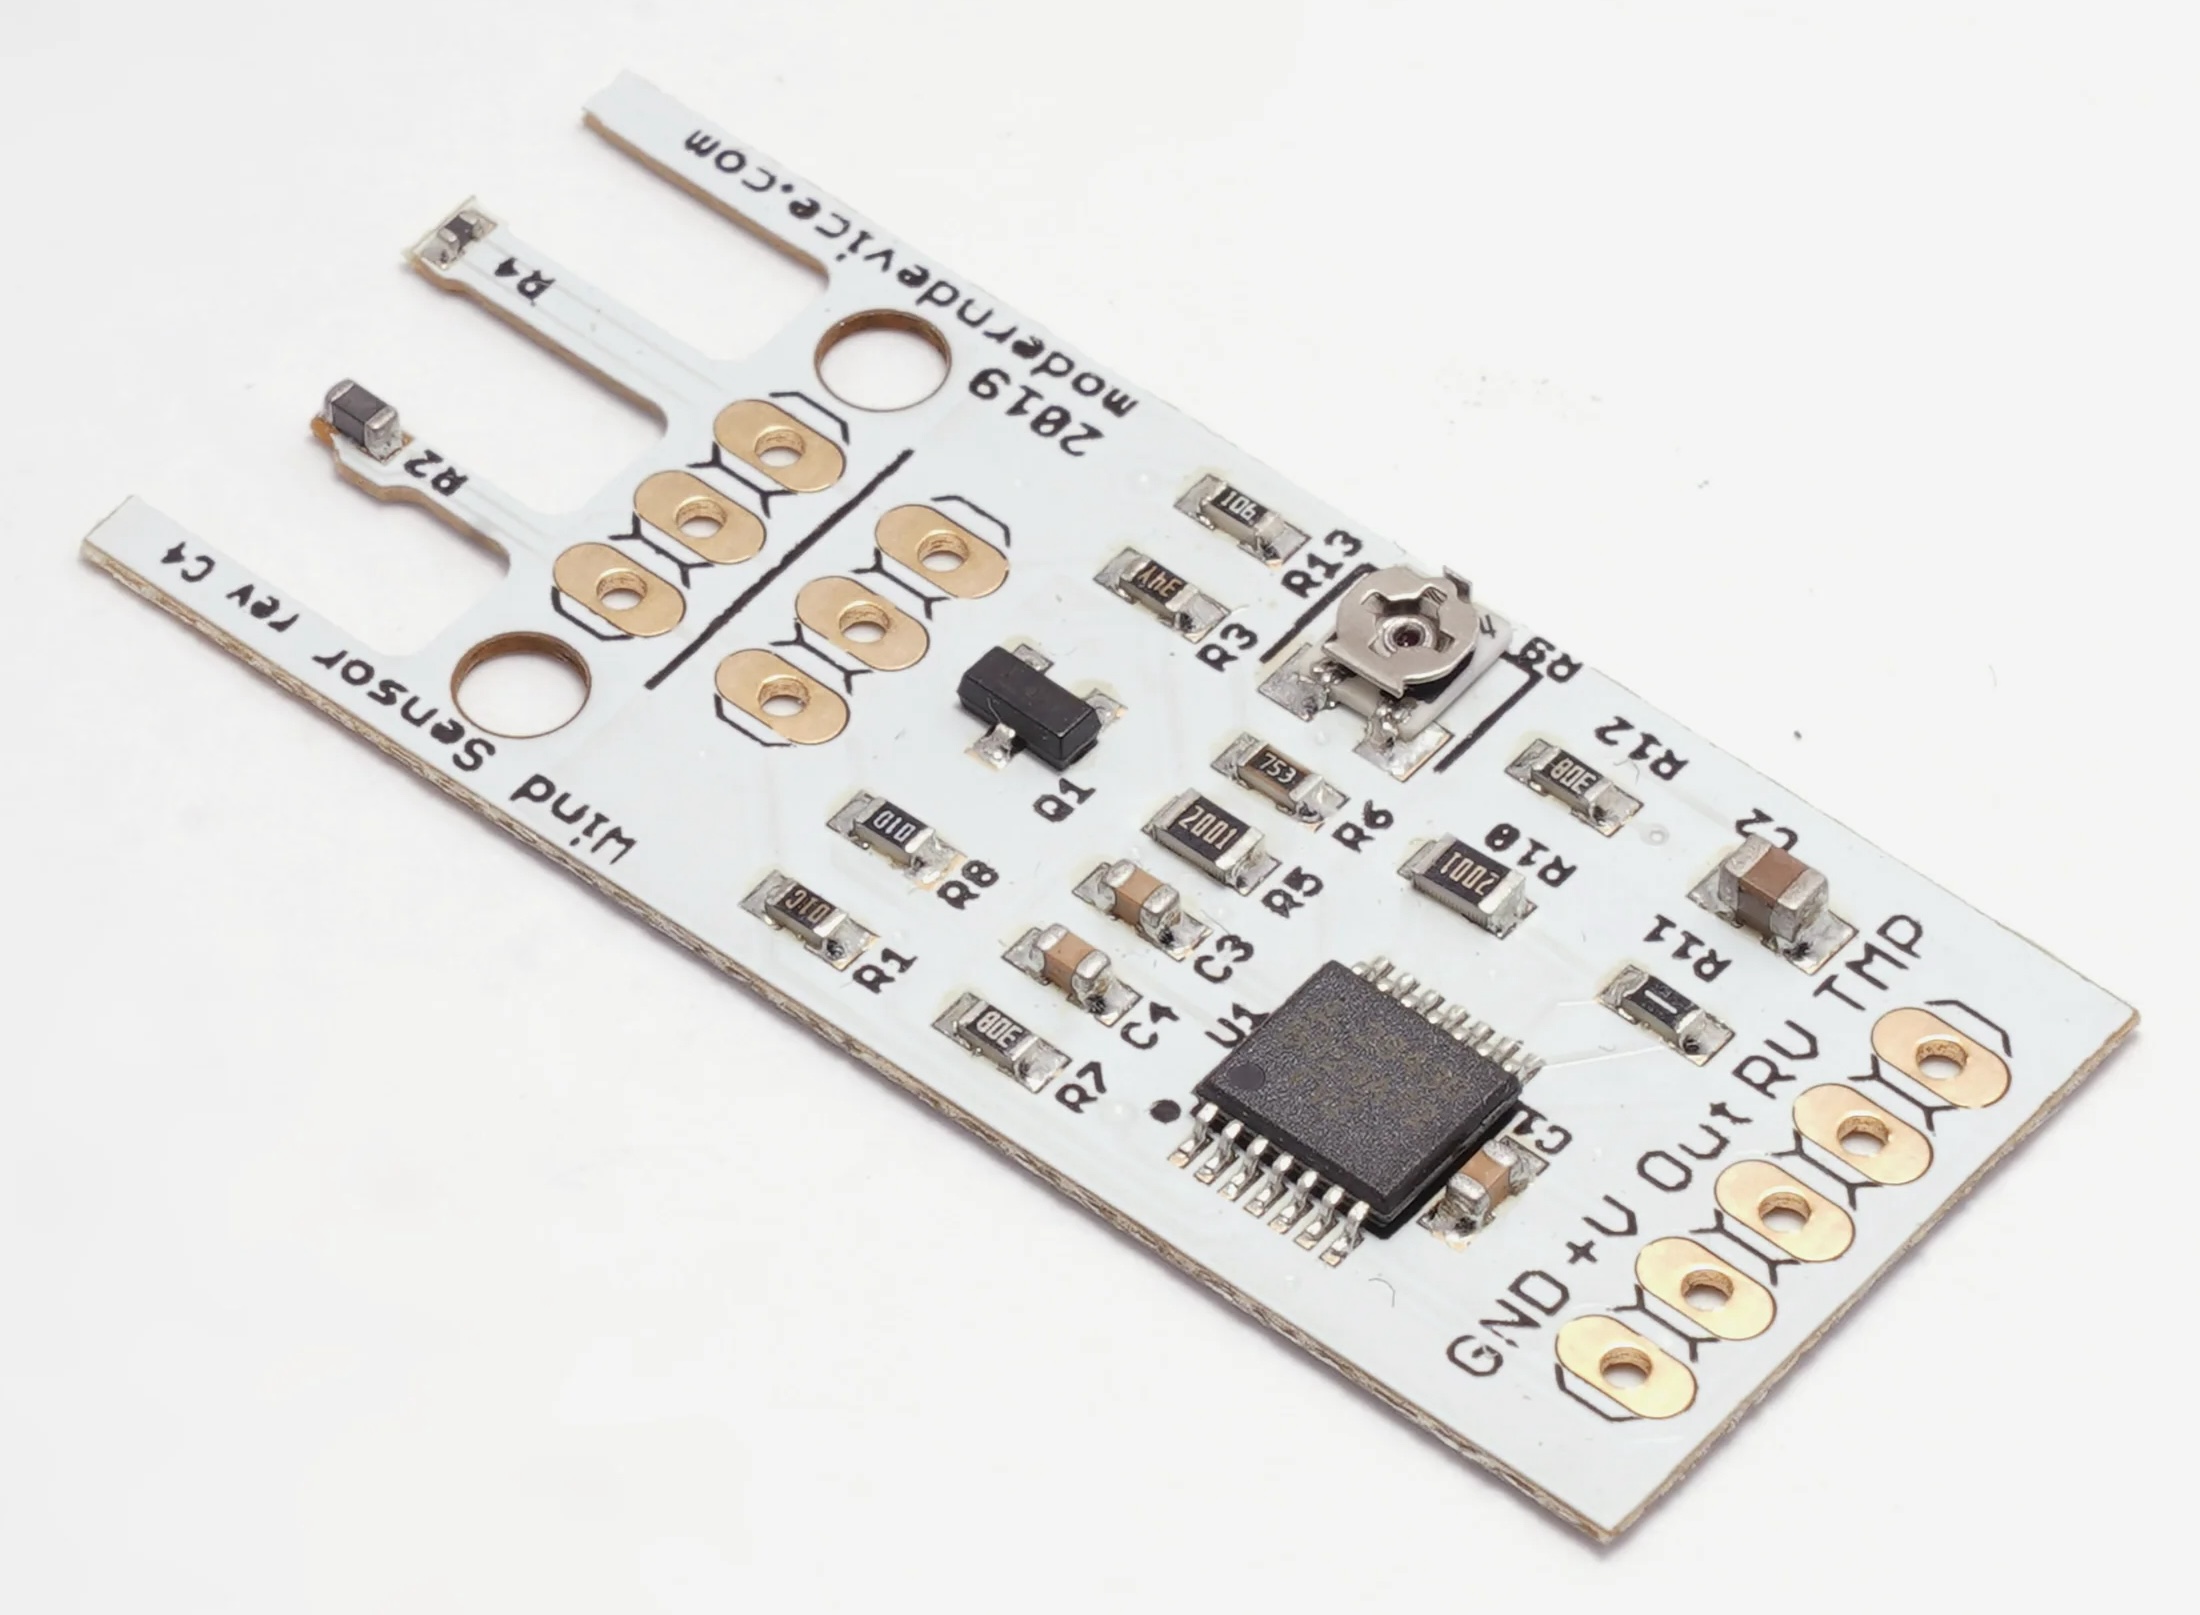
We are using the Modern Device Wind Sensor Rev. C for this recipe (follow the link to learn more details). Compared to professional-grade hot-wire sensors, it is a relatively affordable component with a good amount of adjustability and sensitivity for low and moderate wind conditions. It can also be set up in such a way where indoor air movement or the act of exhaling/blowing sharply might be detected!

The Modern Device Wind Sensor Rev C.
ALTERNATE VERSION
Modern Device also has an upgraded ‘Rev. P’ version of the Wind sensor that performs better in high wind conditions. However it is a lot more expensive and requires a 12V power supply.
The basic premise of hot-wire sensors is a temperature sensor mounted at a fixed distance from a heat source. The changing wind conditions impact the electrical power needed to keep the element heated. This is what gets sensed and reported back to a connected microcontroller.
Wiring & Code
Select a microcontroller platform in the tabs below to view the wiring and code meant for the platform:
-
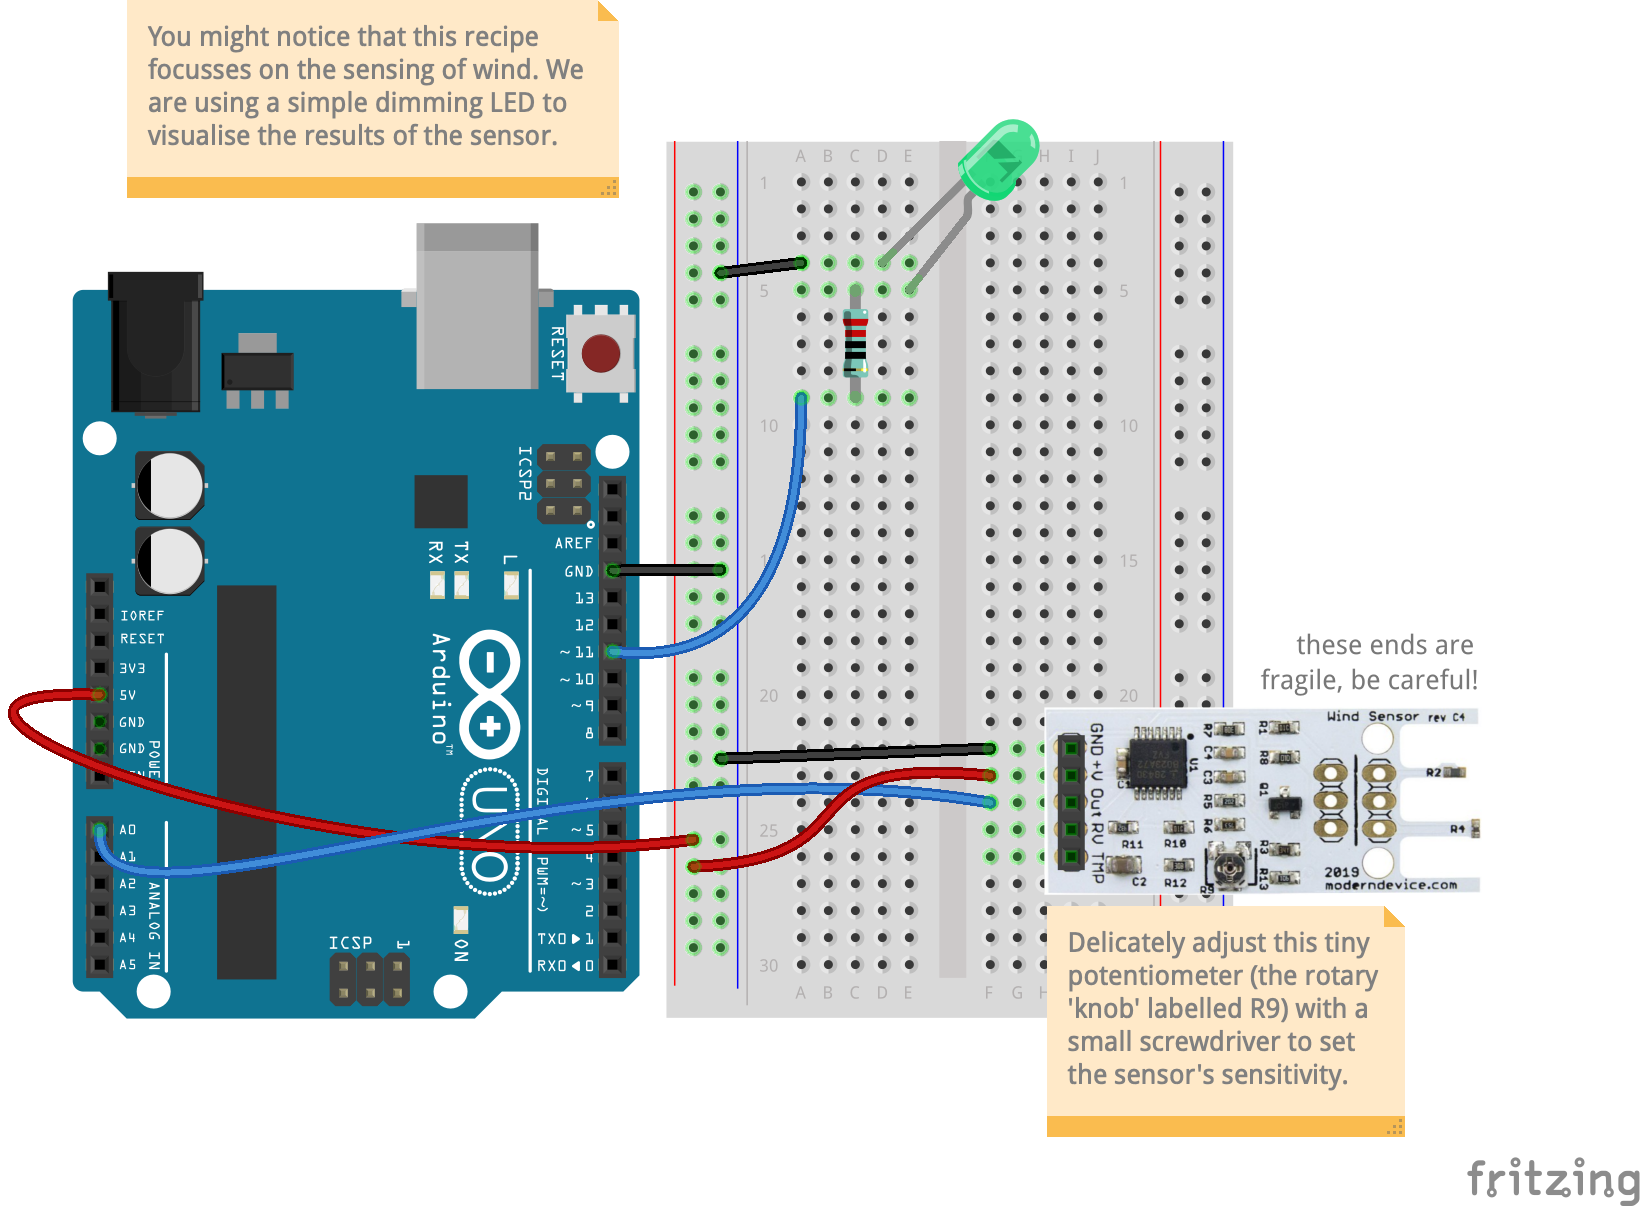
Breadboard diagram
Wind/Breath sensor circuit
Download Wind/Breath Intensity Fritzing file
CodeFor a refresher on how to use the code in this recipe, click here.
1
2
3
4
5
6
7
8
9
10
11
12
13
14
15
16
17
18
19
20
21
22
23
24
25
26
27
28
29
30
31
32
33
34
35
36
37
38
39
40
41
42
43
44
45
46
47
48
49
50
51
52
53
54
55
56
57
58
59
60
61
62
63
64
65
66
67
68
69
70
71
72
73
74
75
76
77
78
79
80
81
82
83
84
85
// Wind / Breath sensing for the Arduino UNO
// Allow air movement to flow around the sensor and observe the changes on the LED's brightness
// Adjust the sensitivity of this circuit in two ways:
// 1) Use a small screwdriver to gently turn the adjustment potentiometer on the sensor
// 2) Edit the code parameters below

/*
  Calibrating the sensor: Use the Serial Monitor to help you establish the 'floor' and 'ceiling' readings of the sensor
  1) Turn on Serial Monitor after connecting the USB cable and selecting the right port
  2) Set the baud rate to 115200 baud (near the bottom right corner of your Serial Monitor panel)
  3) You should immediately see a stream of numbers. If you haven't made any changes to the code below, the first is the 'raw' reading, and the second value is the 'scaled' reading.
  4) Let the sensor rest, and note down the value of the raw wind movement 'at rest'
  5) Get some wind moving over the sensor (fan it, blow across it), and capture your preferred 'maximum' value (highest you can go is 1023)
  6) Update the WIND_MAX and WIND_MIN values below to these noted readings
  7) If you want, edit LED_MINBRIGHT and LED_MAXBRIGHT to customise how bright you want the LED to go
  8) Upload the sketch again with the new parameters. Repeat steps 3-8 to finetune the sensitivity of your circuit
*/

// update these definitions below if you move the pins:
#define WINDSENSE_PIN A0  // analogue input pin A0
#define LED_PIN 11        // we are using the PWM-capable digital pin 11 to drive the brightness of an LED (on the UNO you can alternatively use 3, 5, 6, 9, 10, 11)

// Customise your setup here.
// Change these values to suit your sensing application needs.
// Upload your sketch to the UNO after every edit, and observe the changes in sensitivity.
#define WIND_MAX 520       // set the maximum wind intensity (anywhere from WIND_MIN to 1023)
#define WIND_MIN 100       // set the minimum wind intensity (anywhere from 0 to WIN_MAX)
#define LED_MINBRIGHT 0    // minimum brightness value of your LED (0-255)
#define LED_MAXBRIGHT 255  // maximum brightness value of your LED (0-255)

void setup() {  // runs once at startup
  pinMode(LED_PIN, OUTPUT);
  digitalWrite(LED_PIN, LOW);  // turn off the LED at startup
  Serial.begin(115200);        // here we open up the USB Serial port so that the Arduino can 'send' data back to our computer
}

void loop() {  // runs forever
  // depending on your desired sensitivity, the following lines 'scale' the readings to a range that is suitable for LED brightness output:
  int windVal = analogRead(WINDSENSE_PIN);
  int adjustedWindVal = constrain(windVal, WIND_MIN, WIND_MAX);
  adjustedWindVal = map(adjustedWindVal, WIND_MIN, WIND_MAX, LED_MINBRIGHT, LED_MAXBRIGHT);
  analogWrite(LED_PIN, adjustedWindVal);

  // This Serial output prints out both the 'raw' sensor reading and the scaled one.
  // They are formatted for graphing the values on the Serial Plotter.
  // Comment out the different blocks of code below and see what happens on the Serial Monitor / Plotter.
  // What's the difference between Serial.print and Serial.println?

  //////// raw and scaled wind readings (default)
  Serial.print(windVal);
  Serial.print(",");
  Serial.println(adjustedWindVal);

  //////// raw wind readings only (if you uncomment the line below, comment the other Serial.print lines above (50-52)
  // Serial.println(windVal);

  //////// scaled wind readings only  (follow the similar instructions above – try to figure out what lines to comment/uncomment)
  // Serial.println(adjustedWindVal);
}

/*
    Please note that the code provided here is licensed under the MIT license.

    The MIT License (MIT)
    Copyright © 2025 Chuan Khoo

    Permission is hereby granted, free of charge, to any person obtaining
    a copy of this software and associated documentation files (the
    "Software"), to deal in the Software without restriction, including
    without limitation the rights to use, copy, modify, merge, publish,
    distribute, sublicense, and/or sell copies of the Software, and to
    permit persons to whom the Software is furnished to do so, subject to
    the following conditions:

    The above copyright notice and this permission notice shall be included
    in all copies or substantial portions of the Software.

    THE SOFTWARE IS PROVIDED "AS IS", WITHOUT WARRANTY OF ANY KIND, EXPRESS
    OR IMPLIED, INCLUDING BUT NOT LIMITED TO THE WARRANTIES OF MERCHANTABILITY,
    FITNESS FOR A PARTICULAR PURPOSE AND NONINFRINGEMENT. IN NO EVENT SHALL
    THE AUTHORS OR COPYRIGHT HOLDERS BE LIABLE FOR ANY CLAIM, DAMAGES OR
    OTHER LIABILITY, WHETHER IN AN ACTION OF CONTRACT, TORT OR OTHERWISE,
    ARISING FROM, OUT OF OR IN CONNECTION WITH THE SOFTWARE OR THE USE OR
    OTHER DEALINGS IN THE SOFTWARE.
*/
-
COMING SOON…
More code samples for this component for other platforms will be added here over time.
