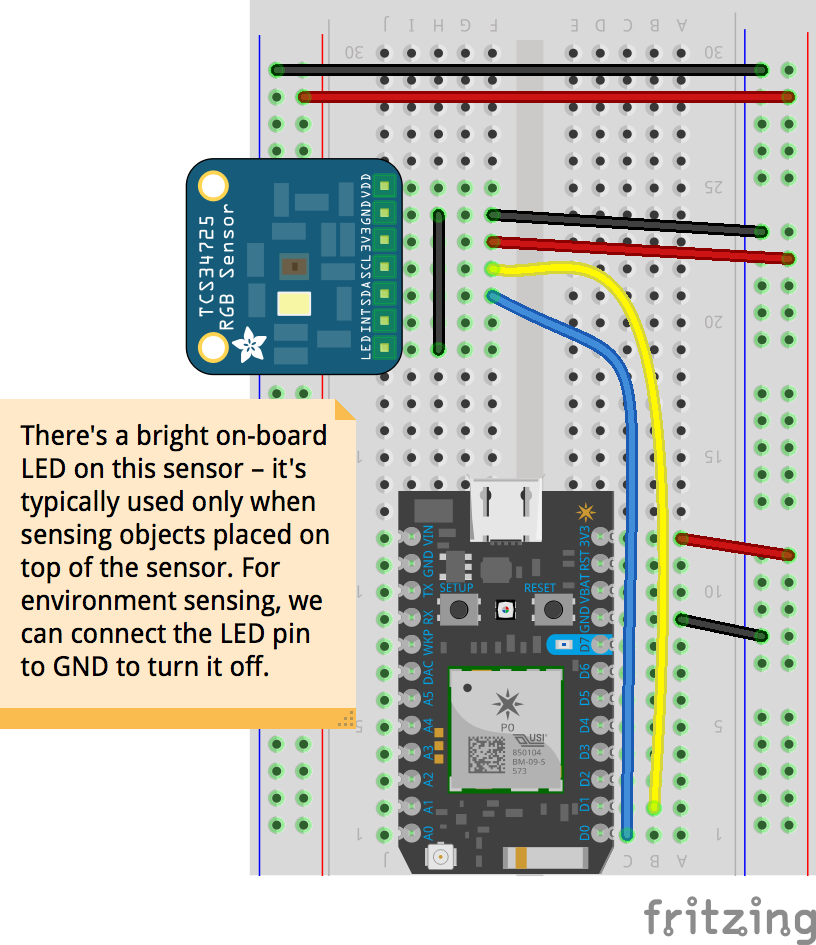
If you need more than just basic ambient light sensing, use the TCS34725 sensor. It's a bit more complicated to wire and write code for, as it uses the I2C protocol for digital communication with the Photon. With these more advanced sensors keep a close eye on your wiring, especially the power supply.
I2C devices communicate to the host microcontroller (in our case, the Photon) via 2 important pins – SCL and SDA. On the Photon, pin D0 = SDA, and D1 = SCL. These cannot be reassigned, so every time you use a sensor with I2C, you have to reserve D0 and D1 for communicating with them.
Because these are I2C sensors, getting Blynk to ‘talk’ to it will require a bit more code. Check the sample below and notice how we are assigning ‘virtual’ pins so that your Blynk app can pick up on them.
Using the IFTTT service to log data using this sensor is pretty much the same – the publish command works just like the analog sensors to log, for example, a new row to Google spreadsheets.
// This #include statement was automatically added by the Particle IDE.
#include<Adafruit_TCS34725.h>#include<math.h>// how long between each log update? feel free to change this value,
// but this must not be anything less than 1000 milliseconds!
#define INTERVAL_BETWEEN_LOGS 5000// initialise the timer
Timer dataTimer(INTERVAL_BETWEEN_LOGS, doDataUpdate);
// initialise the TCS34725 light sensor
char szInfo[128]; // temporary C string to store
Adafruit_TCS34725 tcs = Adafruit_TCS34725(TCS34725_INTEGRATIONTIME_50MS, TCS34725_GAIN_4X);
// code in this setup function runs just once, when Photon is powered up or reset
voidsetup() {
Serial.begin(9600); // Open a connection via the Serial port / USB cable – useful for debugging
if (tcs.begin()) {
Serial.println("Found sensor");
} else {
Serial.println("No TCS34725 found ... check your connections");
}
delay(5000); // Common practice to allow board to 'settle' after connecting online
dataTimer.start();
}
// code in this loop function runs forever, until you cut power!
// for the A/D blackbox, there is nothing to do in here because data updates are handled by our timer
voidloop() {
}
// doDataUpdate runs every interval set in INTERVAL_BETWEEN_LOGS
voiddoDataUpdate() {
// IMPORTANT: to prevent server overload, the Particle cloud can only accept
// update rates of once per second, with the option to 'burst' 4 updates in a
// second (but then you'll get blocked for the next 4 seconds). 'Ration' your
// INTERVAL_BETWEEN_LOGS and the number of readings you are publishing; in our
// default example, we are frugally using just 1 publish, by concatenating
// all the data we want into a single publish statement
// first we save what we want to read into temporary variables first.
// feel free to add/remove these lines as you see fit in your application:
uint16_t clear, red, green, blue;
// grab colour data and store into variables
tcs.getRawData(&red, &green, &blue, &clear); // takes 50ms to read!
delay(60);
// Figure out some basic hex code for visualization
uint32_t sum = clear;
float r, g, b;
r = red; r /= sum;
g = green; g /= sum;
b = blue; b /= sum;
// converts RGB to 8-bit values
r *=256; g *=256; b *=256;
String res ="R:"+ String(r) +",G:"+ String(g) +",B:"+ String(b);
Serial.println(res);
Particle.publish("sensorData", res);
}