Besides getting pre-made sensors, you can also make some of your own ‘sensors’ using materials readily available from craft shops, electronic component stores. The drawbacks with these DIY sensors is that they are one-offs, so don't expect one conductive foam pressure pad to report exactly the same values as the next one you make. They might also be time-consuming to make and are not exactly consistent should environmental factors change (humidity, temperature, etc). Therefore, some adjustments in code will have to be done to make sense of the readings.
That said, these DIY recipes allow for some really quick prototyping and also enable you to build large or non-standard sensors that certain applications might require.
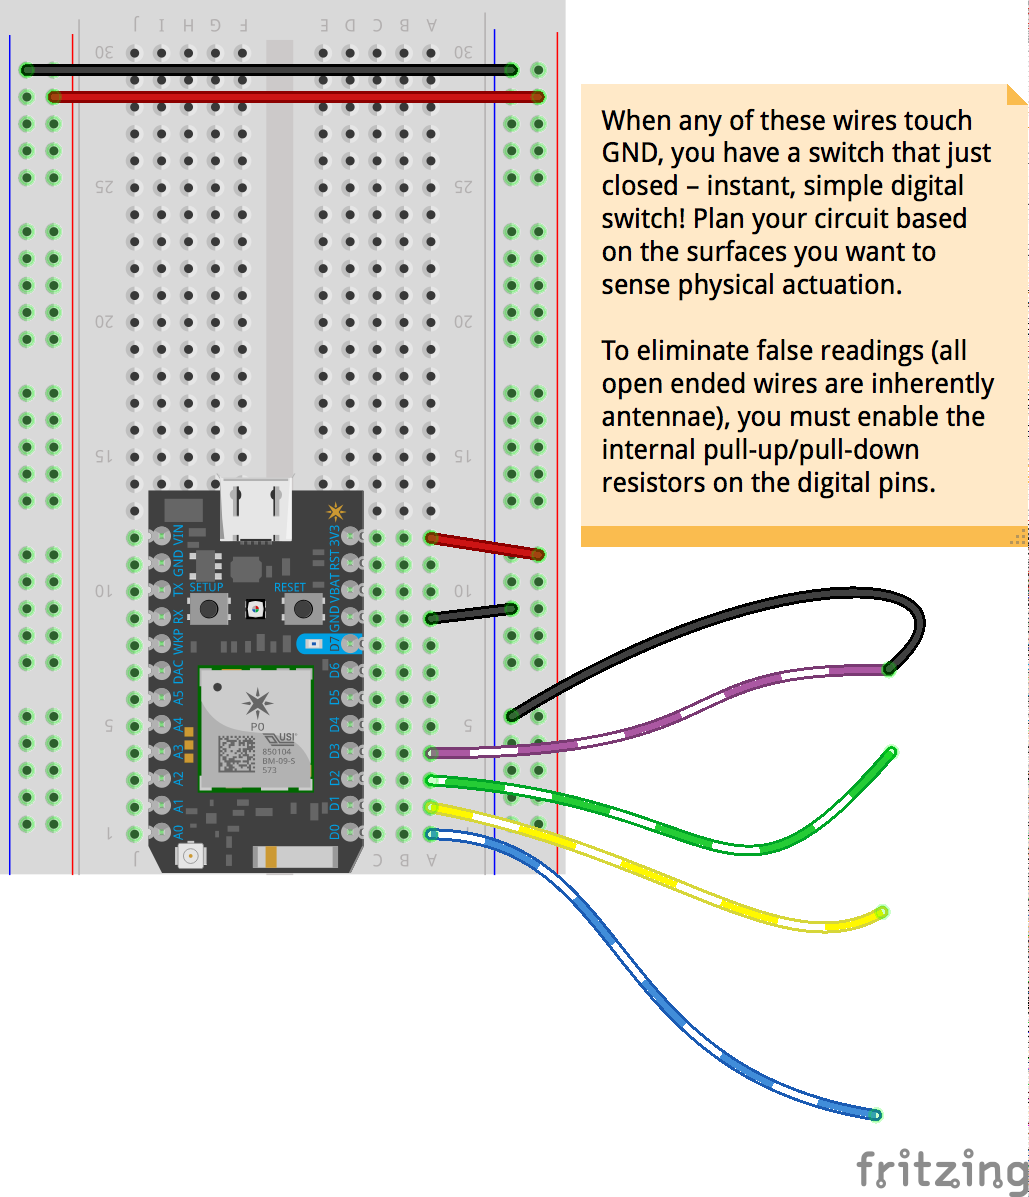
Code-wise, due to the wide variety of DIY sensors you can make, we'll stick with the basic A/D Blackbox as a starting point.
If that still sounds overwhelming, compare the differences between this recipe and other A/D Blackbox recipes – you'll find very little difference between them.
// how long between each log update? feel free to change this value,
// but this must not be anything less than 1000 milliseconds!
#define INTERVAL_BETWEEN_LOGS 5000// initialise the timer
Timer dataTimer(INTERVAL_BETWEEN_LOGS, doDataUpdate);
// code in this setup function runs just once, when Photon is powered up or
// reset
voidsetup() {
Serial.begin(9600); // Open a connection via the Serial port – useful for debugging
delay(5000); // Common practice to allow board to 'settle' after connecting online
dataTimer.start();
pinMode(D0, INPUT_PULLDOWN); // tell the Photon we're using D0 as an INPUT (pulldown resistor enabled)
pinMode(D1, INPUT_PULLDOWN); // tell the Photon we're using D1 as an INPUT (pulldown resistor enabled)
pinMode(D2, INPUT_PULLDOWN); // tell the Photon we're using D2 as an INPUT (pulldown resistor enabled)
pinMode(D3, INPUT_PULLDOWN); // tell the Photon we're using D3 as an INPUT (pulldown resistor enabled)
// if you're adding more digital pins as INPUT, add lines similar to the above accordingly.
}
// code in this loop function runs forever, until you cut power!
// for the A/D blackbox, there is nothing to do in here because data updates are handled by our timer
voidloop() {
}
// doDataUpdate runs every interval set in INTERVAL_BETWEEN_LOGS – this is
// useful to send data streams to services like IFTTT to log data on Google
// spreadsheets, for example
voiddoDataUpdate() {
// To keep their server load optimal, the Particle cloud can only accept
// update rates of once per second with the option to 'burst' 4 updates in a
// second (but then you'll get blocked for the next 4 seconds). 'Ration' your
// INTERVAL_BETWEEN_LOGS and the number of readings you are publishing; in our
// default example we are using just 1 publish but concatenating all the data
// we want into a single publish statement
// first we save what we want to read into temporary variables first.
// feel free to add/remove these lines as you see fit in your application:
bool D0State = digitalRead(D0); // read a digital true/false state from D0
bool D1State = digitalRead(D1); // read a digital true/false state from D1
bool D2State = digitalRead(D2); // read a digital true/false state from D2
bool D3State = digitalRead(D3); // read a digital true/false state from D3
// now we form the concatenated string to put them all together. This String must NOT exceed 255 characters!
String output ="D0:"+ String(D0State) +",D1:"+ String(D1State) +",D2:"+ String(D2State) +",D3:"+ String(D3State);
// prints this out the Serial port (coolterm) for us humans to verify and debug; comment the next line if you don't want to see it in Coolterm
Serial.println(output);
// finally, send it out (and have your IFTTT recipe ready to use it):
Particle.publish("sensorData", output);
}