IoTa + Photon
The BIG ONE: Combining IoTa + Photon Recipes
Now that you have a basic understanding on how you can write and create simple interactions on the Photon, let's put all of the technological portions we have learnt together. This is why it's called the BIG ONE – the moment where you finally get to blend all these different technological frameworks together!
This is probably the most daunting part of the technological aspects of this studio, so take your time to understand this (and post your questions on #slack).
Since each group will also have their own unique use cases, there cannot be every possible example written here in this resource. However it is hoped that this page will give the foundation needed to then build on more complex layers of data, sensors and actuators.
With that said, here's a very common sequence that summarises your development scenario:
- You have chosen the dataset(s) (from various sources) to work with
- You have selected, filtered, and scaled this set of data into a steady stream of ‘cleaned’ values within IoTa
- You want this stream of data to effect a mechanical contraption connected to your Photon circuit
- You want the data to continually ‘feed’ and update your prototype's physical appearance through some electro-mechanical setup you have put together.
This page provides a general ‘overview recipe’ on how to do this.
Video
Here's a tutorial video of me talking through the details of an IoTa + Photon setup (fullscreen playback recommended). The example here uses the Feature Lighting dataset, and also relies on a modified servo circuit + Photon code.
1. Setting up the dataset
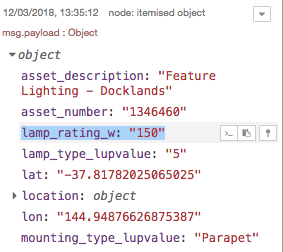
We now have a flow that is producing a steady stream of numbers (lamp wattage) from the Feature Lighting dataset:

Let's use the wattage of the lights, captured in this data stream, to drive the position of a servo arm:

At this point, you should understand that this lamp_rating_w property will change as each light entry is iterated through. Knowing this changing value, we can then send it out to a Photon.
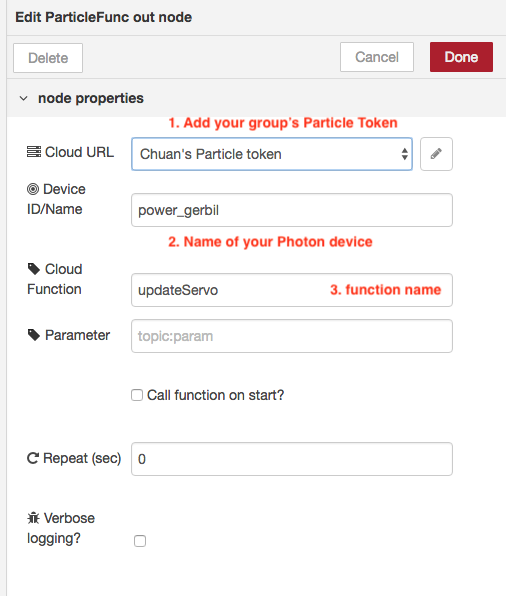
In order to send ‘instructions’ to a Photon directly from within iota.mdit.space, we can use the ParticleFunc node. Drag one from the palette, and configure it following the instructions given via the Info panel:

Cloud URL / Particle Token: This can be found in your account's build.particle.io page, under the Settings panel
Device ID / Name: Also found in your account's build.particle.io page, under the Devices panel
Cloud Function: A case-sensitive name we will use throughout from iota.mdit.space to our Photon code
2. Mapping the Dataset
With the ParticleFunc node configured, take a look at the rest of this example flow:

We already know that this flow is ‘downstream’ of our Feature Lighting dataset (have a look at the Link nodes that provide a ‘wireless’ connection in the interface).
The ‘Range’ node scales the incoming lamp wattage to a range that suits a servo's minimum / maximum angle. In other words, the lowest wattage (3W) is mapped to 0º, while the highest wattage (500W) is mapped to 180º.
The ‘and gate’ provides an easy way to control the data flow manually, while the Function node contains code that formats the payload into a string expected by the Photon.
What is the string expected by our Photon? The Photon code I have written is designed to accept the following format:
[command],[argument1],[argument2]So, in the case of controlling a servo, that would become:
[servoCommand],[servoID],[servoAngle]and to be very explicit, here's an example of the servo command you send as a string in IoTa:
0,0,75…which tells the sole servo connected to the Photon to turn its arm to 75º.
What we have done essentially is to grab the raw data feed, ‘clean’ it to a re-scaled range of numbers, and sent it out at regular intervals to our Photon.
We are now ready for the final part – modifying the Photon code to accept these instructions.
3. Photon circuit & code
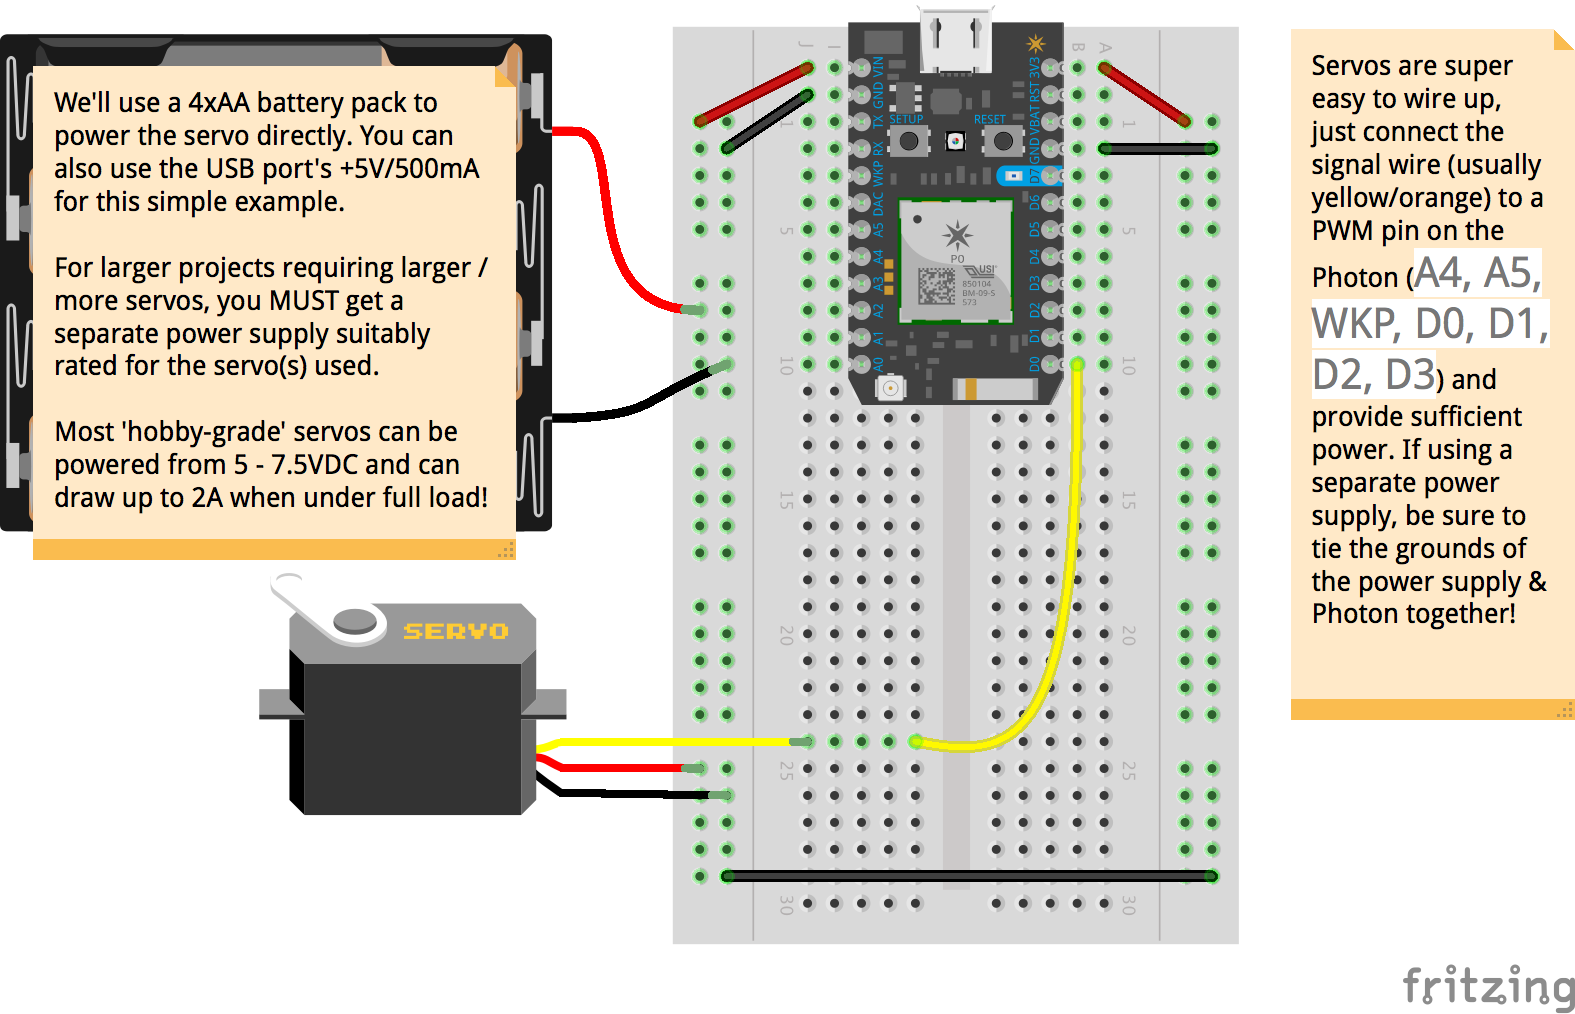
If you haven't already, you should study the Servo Expression recipe to understand how to physically set up the circuit. Here's a simplified version of the same servo circuit:

We will now modify the code in such a way that the Photon is able to ‘listen’ in to incoming values (see the Code section below).
The most critical addition is the introduction of:
|
|
and the updateServo function (see Code below), which contains quite a bit of code to parse the incoming string from iota.mdit.space into instructions for the circuit.
If you followed all the steps above, you should now see your servo arm move at one second intervals whenever the data changes. As you can tell from the data, the light wattage sometimes does not deviate much between different sets of lights, so you will not experience the servo arm moving every single second.
Feeling adventurous? Try a different data set that have a much large variance in numerical output, and see if you can get your servo to move more actively!
Libraries Used
(learn how to import them in the Build IDE):
- none
Code
|
|
